lördag 12 december 2015

The dollhouse - Part II

The stories of building a doll-house...

Now that we had a empty doll-house we needed to make some furniture and get in the dolls. The Autumn brought a lot of work, homework and activities. So we waited for a dull weekend in December to work on our long term project, the doll house. During the Autumn I saved a lot of different stuff that could be used in this project, somehow. Sometimes it is hard to tell the difference between saving garbage and potential and "art" materials. This time the 9 year old was at a friends' home baking so I sat with the 5 year old and we made the beds and a lamp together.

The beds: 

We used old cardboard that I don't even remember what they housed before turning into the doll's beds.
 

Using ribbons from last Christmas and my favorite tool (the hot glue gun) we decorated the sides of the beds. To do the headboard of one the beds we used a crown my daughter got in a Princess magazine, glue paint and drinking straws. 


On the other bed we used a plain hard paper, the kind of paper you can use to do postcards. We glued a ribbon on the top and a golden star in the middle. To do the mattresses I took some cleaned old clothes and cut them in order to fit the beds. I wrapped a lining fabric around them. I could have ironed it, but once again this is a quality time project with no ambitions for perfection. So I struggled with myself and accepted it to be wrinkled. 

The lamp: 

I save a lot of stuff... like corks and the metal around some of them. The metal part was perfect to use when we made a lamp for the doll-house. We just took the round metal holder and voilá the only thing we needed was to glue on a fabric. 


The next step was to put it on the doll-house's ceiling... I just took a needle and thread and made a simple hanging device that was glued on to the ceiling with my sweet blue hot glue gun. 


A not so good picture that shows the lamp attached to the ceiling. 

Four happy dolls on their new beds!

So now we have a doll-house with two beds and a ceiling lamp. The Christmas holidays are near for the kids and me (I'am a teacher working almost full time). Let us see what we can make for our doll-house together and what kind of stuff we will use. The doll-house saga will continue...    


The dollhouse - Part I

Stories of building a doll-house...


The dollhouse is a project I have been thinking about for a long time! I came to realize that the more I idealized the "perfect" doll-house the less I wanted to build it.  Besides the main reason I thought of this project was to do something together with my children. So that is OUR project, not mine.

Using materials we had at home from many different objects and being creative we can spend quality time together. My children are 9 and 5 years old so i have of course to do some of the work.

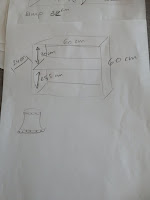
I bought a old shelf on a second hand shop. We came home and had a good look at it and we spoke about what we wanted to do with it. WE draw a quick sketch so we had something to follow during our long term project:


           sketch 
sketch
I cleaned it very well (I'm peaky in that mather) and I put the kids to work making the surface smoother so we could paint it. Even my kids' friends wanted to help when they visited us!


The original shelf and some of the materials we used.

As you might imagine we did not made the dollhouse in one day. This is a long term project and WE will not get stressed about it. We work on it when we wish to do so.
Once again: quality time together being creative!

Paintjob going on! 
I chose water based paint because the children were doing the paintjob and I didn't want then to work with dangerous chemicals of any kind. That made it harder to paint it well and the surface is kind of transparent.

To do the wall paper downstairs I used some adhesive paper that I had left from that I used to wrap around the aquarium. The floors are too made of adhesive paper that we bought for other purposes.


The ramp/stairs are plain cardboard and the same adhesive paper we used to do the flooring.
Now we have a empty doll-house. Next step is to do furniture and bring in the small dolls that were too bought at a second hand shop!

söndag 13 september 2015

Two yummy pear jam - marmalade recipes

The school my kids attend has a big and great backyard with fruit trees. This year they had a lot of fruit and asked the parents to take fruit. They have several apple and pear trees. I made a deal with the teachers; if I take some fruit they will get some jam to give their staff meeting bread a special touch. I know that is always welcome at teachers staff meetings because I am a teacher.Besides it is a perfect give away present you can have at hand or just a way to give a luxurious touch to your toast.   So I searched the web in several languages to fins a nice recipe but I had to make some adaptations. I made two different kinds of jam (or marmalade if you prefer to call it that).

Pear and ginger jam


Ingredients

750 grams of chopped pears
20 grams of fine grated fresh ginger
6 deciliters of sugar (granulated)
2 deciliters of water
the juice of 1 lemon
2 tea spoons of pectin in powder
a pinch of natrium benzoate


About measuring... 


If you can't follow grams and deciliter way of measure stuff you can easily convert those into a way of measure stuff that feats you better right here


Instructions


1. Peal and clean the pears.

2. Chop the pear in small cubes.

3. Weight 750 grams of your pear cubes. If you have some extra you can use it in a fruit salad or to garnish your breakfast cereals.

4. Put the pear cubes, the ginger, the lemon juice and the water to boil in a larger pot.

5. Let it boil in "middle" temperature until the pears became soft. The important thing about this step is to not let the pears burn to your pot. My stove may not be like yours so I can't tell you how long it takes. Keep an eye on it.

6. My second favorite step: mash it! If you like bigger pieces of fruit do not mash to much, if you like a leaner consistence mash it well.

7. Blend in the sugar, the pectin and the natrium benzoate.

8. Put it to a boil. When it starts to boil lower the temperature and leave to boil for five more minutes.

9. Boil clean jam or marmalade jars with water and salt and leave them to dry on a very clean cloth. You will need about one liter in jars. Just choose the sizes that better fit your purpose.

10. Fill your jars carefully while the jam is still hot and close them well.
Let them dry before you clean them and put some nice paper or fabrics on them.

11. Finally we came to my favorite step: enjoy it on a toast!


Pear and whiskey jam

Follow the recipe above except that you don't put any ginger on it and you substitute half of the water with whiskey!